Point&Shoot - HDR/DOF Workflow
There are better and more sophisticaed treatmets of HDR around, but this guide aims to show how to optimise results with cheap, low-tech equipment.
I carry a tiny camera (97x54x24mm, 150g) around with me everywhere i go, and all my London photos are taken with a Panasonic Lumix DMC FX100.
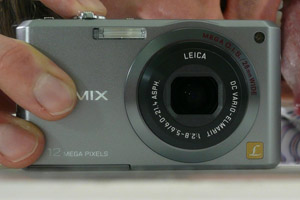 If i had to carry a heavy brick around my neck to take photos - i wouldn't. This is best compromise mobility and image quality. And i also believe that "the best camera is the one that's with you", and i value capturing the moment over technical perfection.
The Lumix allows me to "bracket" i.e. take more than one exposure (most point & shot models are limited to three exposures) of the same scene with one trigger release. This allows me to create HDR (high dynamic range) photographs.
Before HDR, i used to select dark or brigth image areas to adjust contrasts locally. You could also create artificial HDR photos by adjusting the contrasts of a single photo and layering those photo over one another, preferably from a RAW file. Both methods could result in ugly banding or a step effect in color gradients and holes in your colour gardient.
 If you scan images or objects (!) you can also experiment with your scanner to run multiple passes with different settings to achieve better contrast levels.
Before becoming popular in photography, HDR had already been used in 3D computer graphics as global illumination maps.
By taking three or more photos with different exposure setting of the same motif and combining them into a single photograph, one obtains a greater range of contrasts. Of course, it would be good if the camera sensor could capture a greater range in a single go, but they not yet as good as the human eye. In photography HDR simply means more details in the highlights and more details in the shadows, it also means that i can correct exposure in post-production AFTER having taking the photo.
One disadvantage though, is that HDR photography usually requires a tripod (for best results, i have this one in my pocket) and works best for still scenes without movement, and also brings the greatest improvements in low light conditions. Free-hand HDR shooting works with short exposure times in bright light conditions, but is a compromised over a tripod.
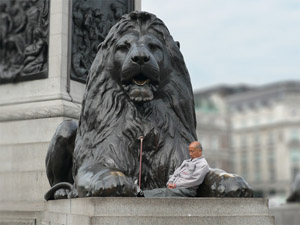
Now for a practical example. I took three exposures of this secene on Trafalgar Square:
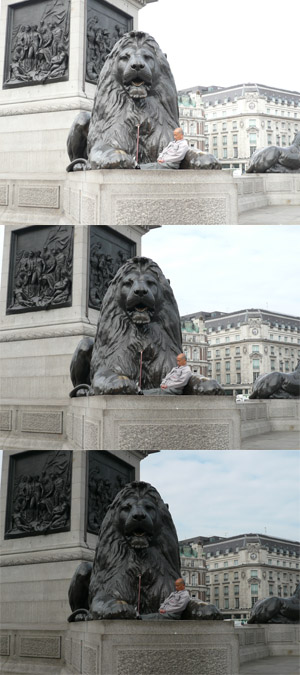 You can see that in the lightest photo the sky is white (which it wasn't) and blown-out (doesn't happen often in nature) but ok in the darker versions, but that the lighest version offers more details of the cast iron column ornament in the top left corner. I use photomatix to combine my photos. After contrast correction photo looks like this:
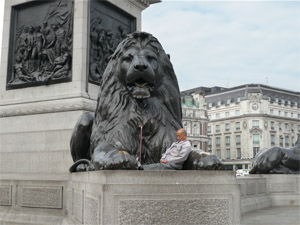 More like what te eye would see.
I then decided to increase the focus on the image centre. My camera does not allow much play with depth of field unless when in macro mode, so it is usually all sharp or nothing. But the photo offered clearly defined edges so it was easy to trace them, and it would look even better when scaled down to "facebook-album-proportions". (If hard edges are visible after applying effects to a selection, blurr the edges a bit.) To be able to selectively apply a depth of field (dof) effect i created a selection for the lion only (white).
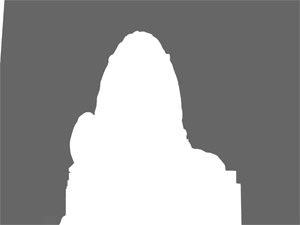
And i also created selections for other areas of the image because i decided to create a more sophisticated dof effect:

It is common in the 3D workflow, next to alpha maps, to render depth-of-field maps. See example below:
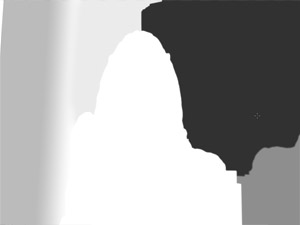
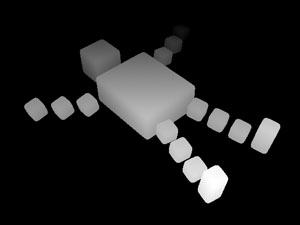 These are simple renders in which the whiteness of a point depends on its distance from the camera. This map allows to apply a blur effect to the final image, the strenght of which will depend on the white-levels of the image (e.g. white=1, black=0, grey=0.5 blur strength). I was using the same concept in setting up my depth-of-field map for this photograph and added some simple black-white gradients where distance was changing:
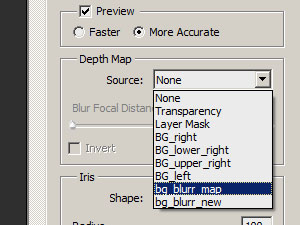
 Recent versions of Photoshop have an excellent camera-blur filter (Filters-> Blur-> lens blur), with a range of setting, and most conveniently; the blurring does NOT bleed outside of the selection. Regular gaussian blur does, and is therefore very unsuitable for this purpose. The lens blur dialog allows you to select a grey-scale channel map:
 But even if this hadn't been possible we could have blurred he whole image and used a layer mask to super-impose the desired blurred image parts.
Final and cropped image then looks like this:
But even if this hadn't been possible we could have blurred he whole image and used a layer mask to super-impose the desired blurred image parts.
Final and cropped image then looks like this:
Large: 800X500
Other examples: [1], [2] and [3].
If you overdo it, you end up with a tilt-shift effect.
Because i use a tiny camera, with a tiny sensor, photos often come with a lot of noise, even though i shot one level below maximum resolution. A quick fix to get rid of color noise (if you don't have any nik tools to hand), is to blur (3 to 5px radius) an instance of the final merged image and set the blending mode to "color".
Before (300% magnification of lion nose):
 After (rainbow colour noise gone):
Hope you you found this useful or inspiring. Let me know if you have any comments.